QLIK-SENSE MOBILE APP CONFIGURATION
================================================
Description | |
| |
Resolution | |
2. Pre-requirements (Server side)
3. Configuration (Server side)
4. Configuration (Client side)
| |
Thursday, 25 October 2018

Sunday, 7 October 2018
QLIK Function
PEEK() VS PREVIOUS() FUNCTIONS
Introduction
Qlikview has many useful and sometimes underused functions that can make your life as a developer a lot easier.
Peek and Previous are two of those functions. The definitions below are taken from QlikView Help.
Previous (expression)
Returns the value of expression using data from the previous input record that was not discarded due to a where clause.
In the first record of an internal table the function will return NULL.
The previous function may be nested in order to access records further back.
Data are fetched directly from the input source, making it possible to refer also to fields which have not been loaded into QlikView, i.e. even if they have not been stored in its associative database.
Examples:
Load *, Sales / previous (Sales) as Increase from …;
Load A, previous (previous (A)) as B from …;
Peek (fieldname [ , row [ , table name ] ] )
Returns the contents of the fieldname in the record specified by row in the internal table tabe name.
Data are fetched from the associative QlikView database.
Fieldname must be given as a string (e.g. a quoted literal).
Row must be an integer. 0 denotes the first record, 1 the second and so on.
Negative numbers indicate order from the end of the table. -1 denotes the last record read.
If no row is stated, -1 is assumed.
Table name is a table label, see Table Labels, without the ending colon. If no table name is stated, the current table is assumed.
If used outside the load statement or referring to another table, the table name must be included.
Examples:
Peek (‘Sales’)
Returns the value of Sales in the previous record read ( equivalent to previous(Sales) ).
Peek (‘Sales’, 2)
Returns the value of Sales from the third record read from the current internal table.
Peek (‘Sales’, -2)
Returns the value of Sales from the second last record read into the current internal table.
Peek ( ‘Sales’, 0, ‘Tab1’ )
Returns the value of Sales from the first record read into the input table labeled Tab1.
Load A, B, numsum (B, peek( ‘Bsum’ ) ) as Bsum…;
creates an accumulation of B in Bsum.
In its simplest form, Peek () and Previous () are used to identify specific values within a table. All the examples in this document are based upon the simple table below:
Set the Scene
Company ABC wants to be able to keep track of monthly employee totals.
Currently they only collect data for month, hires and terminations.
They would like to add fields for Employee Count and Employee Var to see the monthly difference in total employees.
TAB.
FUNCTIONS, FEATURES AND TRICKS USED
To create the Employee Count and the Emloyee Var fields in QlikView, the following QlikView functions, features and/or tricks were used:
Use of Peek() function
Use of Previous() function
Use of RecNo() function
This application assumes that the current date is April 1, 2013.
Peek () Function
As mentioned earlier, in its simplest form the peek() function lets you identify any value loaded for a defined field.
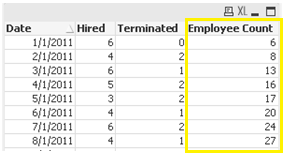
If(row no()=1, Hired-Terminated, peek([Employee Count], -1)+(Hired-Terminated)) as [Employee Count]
In this expression we first look to see if the rowno () is equal to 1. If it is equal to 1, no Employee Count will exist so we will just populate the field with the difference of Hired minus Terminated. If the rowno() is greater than 1, we know that there will be and Employee Count field so we will look at last month’s Employee Count and use that number to add to the difference of that month’s Hired minus Terminated employees. Notice too that in the Peek() function we are using a (-1). This tell QlikView to look at the record above the current record. If the (-1) isn’t specified, QlikView will assume that you want to look at the previous record.
Two important things to remember about the Peek () function are:
When using the Peek() function you should think about using the order by clause to ordering the file
When using the Peek() function, you can specify the exact row that you want to reference.
When using the Peek() function, you can reference a field that was not previously loaded. In this example, Employee Count was not part of the original file and we are creating the field on the fly in the script.
[Employees Init]:
LOAD
rowno() as Row,
Date(Date) as Date,
Hired,
Terminated,
If(rowno()=1, Hired-Terminated, peek([Employee Count], -1)+(Hired-Terminated)) as [Employee Count]
From
[Peek vs Previous.xlsx]
(ooxml, embedded labels);
After loading the file, you can see the Employee Count field was correctly calculated using the Peek() function.
TAB2
Previous () Function
As mentioned earlier, in its simplest form the Previous() function lets you identify the last value loaded for a defined field.
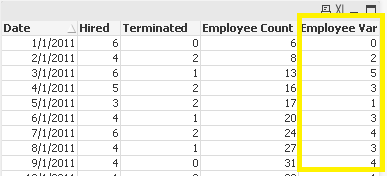
If(rowno()=1,0,[Employee Count]-Previous([Employee Count])) as [Employee Var]
In this expression we first look to see if the rowno() is equal to 1. If it is equal to 1, we know that there will be no Employee Var because there is no record for the previous month’s Employee Count so we simply enter 0 for the value. If the rowno() is greater than 1, we know that there will be and Employee Count field so we will look at last month’s Employee Count and use that number to subtract that number from the current month’s Employee Count to create a field named [Employee Var].
Two important things to remember about the Previous() function are:
When using the Previous() function you should think about using the order by clause to ordering the file.
You can only reference a previously loaded field when using the Previous() function.
Anytime that you use the Previous() function, you could also use Peek() instead.
[Employee Count]:
LOAD
Row,
Date,
Hired,
Terminated,
[Employee Count],
If(rowno()=1,0,[Employee Count]-Previous([Employee Count])) as [Employee Var]
Resident [Employees Init] Order By Row asc;
After loading the file, you can see the Employee Var field was correctly calculated using the Previous() function.
Tab3
Summary
Peek () and Previous () allow users to target defined rows within a table.
The biggest difference between the two functions is that the Peek() function allows the user to look into a field that was not previously loaded into the script whereas the Previous() function can only look into a previously loaded field. Previous() operates on the Input to the Load statement, whereas Peek() operates on the Output of the Load statement. (Same as the difference between RecNo() and RowNo().) This means that the two functions will behave differently if you have a Where-clause.
So the previous () function would be better suited for when a user needs to show the current value versus the previous value. In the example we calculated the employee variance from month to month.
The peek () function would be better suited when the user is targeting either a field that has not been previously loaded into the table or if the user needs to target a specific row. This was shown in the example where we calculated the Employee Count by peeking into the previous month’s Employee Count and adding the difference between the hired and terminated employees for the current month. Remember that Employee Count was not a field in the original file.

Thursday, 27 September 2018
QlikView
Processing with QLIK
Issues With CPU in QLIK
--> Not able to utilize full performance of CPU
1) Description:-
The number of CPU affinity for the QVS does not match the CPU cores in the Server.Cause:-
This issue comes from a new BIOS setting introduced in the Generation 9 of HP servers.A new setting has been added in BIOS that needs to be modified to allow the QlikView services properly detect all the CPU Cores in the machine.
Resolution:-
This issue can be resolved by changing the BIOS setting "NUMA Group Size" to "Flat".
The default setting for "NUMA Group Size" disables QlikView from properly detecting all
CPU cores in the hardware, and thereby
From HPs manual on the subject: "Use this option to configure how the system ROM reports
the number of logical processors in a NUMA (Non-Uniform Memory Access) node. The
resulting information helps the operating system group processors for application use. To set
NUMA Group Size Optimization:
From the System Utilities screen,
select System Configuration →
BIOS/Platform Configuration (RBSU) →
Performance Options →
Advanced Performance Tuning Options →
NUMA
Group Size Optimization and press Enter.
Select a setting and press Enter:
Clustered (default)—Optimizes groups along NUMA boundaries, providing better performance.
Flat—Enables applications that are not optimized to take advantage of processors spanning multiple groups to utilize more logical processors."
======================================================================
2) Description
NUMA, Non-Uniform Memory Access, is a computer memory design used in Multiprocessing, where the memory access time depends on the memory location relative to a processor. Under NUMA, a processor can access its own local memory faster than non-local memory, that is, memory local to another processor or memory shared between processors.
QlikView generally performs better with NUMA disabled. The NUMA setting is controlled by the computer BIOS, and the recommendation is to disable it for best possible performance.
Some hardware does not allow disabling NUMA. For these scenarios QlikView 11.20 SR2 and later can automatically detect the presence of NUMA and if present adjust the QVS.exe to adapt to a NUMA environment. While not as efficient as disabling NUMA in BIOS, it restores some of the performance lost when NUMA is enabled.
The automatic detection only works in 2 or 4-socket systems. For 8 socket machines the NUMA detection fails, leaving the QVS.exe to believe itself to exist in a non-NUMA environment.
The software NUMA adaption is controlled with the EnableNumaRoundRobin variable in the QlikView Server settings.ini file.
From the tests which Performance & Scalability team is doing on new releases they have not seen any NUMA specific changes in QV 12.10 and 12.20.
The recommendations can be found on community: https://community.qlik.com/docs/DOC-2362 they are being updated if Performance & Scalability team sees that changes in server configurations impacts the performance. So it worth checking them from time to time.
Please keep in mind that Performance & Scalability team tries to test many hardware configurations, but it is still a very small subset of possible server configurations seen in customer deployments. Due to this, in case of doubt they suggest to test the settings impact. For example one customer might on average see that for their deployment disabling NUMA in BIOS is beneficial, while other might not notice any difference.
Resolution:-

EnableNumaRoundRobin
0 (default): Automated state where QlikView Server at startup detects whether NUMA is enabled or disabled at certain hardware and adapts to it. If NUMA is enabled QlikView Server will ignore NUMA nodes when allocating memory.
1: QlikView Server is acting as if NUMA is enabled from BIOS (without any attempts to detect it)
2: QlikView Server will not ignore NUMA nodes if present (i.e. NUMA enabled)
The Settings.ini file can be found in the following location:
Windows Server 2003
C:\Document and Settings\All Users\Application Data\QlikTech\QlikViewServer
Windows Server 2008 and later
C:\ProgramData\QlikTech\QlikViewServer for Windows 2008 and later
========================================================================
3) QlikView and NUMA
NUMA technology typically provides performance gains over other multiprocessing
architectures especially if a software application is designed to take advantage of NUMA. However, extensive
tests at our Scalability Center prove that NUMA-enabled servers have a negative impact on QlikView Server
performance. This impact is less noticeable on systems with fewer CPU sockets as the need to access remote
memory is reduced. Therefore, for NUMA architectures, it is beneficial to disable NUMA in the BIOS settings of
the hardware running the QlikView Server in order to achieve optimum performance. Some vendors have removed
the ability to turn off NUMA in the BIOS. If that is the case, a soft-switch has been implemented into the QlikView
configuration which circumvents NUMA memory allocation. Since QlikView 11.2 SR2, QlikView will automatically
detect if NUMA has been disabled and adapts appropriately for optimal performance. (For QlikView releases prior
to QV11.2 SR1, see this document for more information on this setting: http://community.qlikview.com/docs/DOC-23
62) If a QlikView application (.QVW) is opened and loaded into memory on a NUMA-enabled system with the
soft-switch logic disabled, the operating system will use the local memory for one CPU at a time. When necessary,
it will use remote memory within another NUMA node (See Figure 1). (CPU access time to its local memory is

needing access to the same memory if “everything” is stored in one place. Since QlikView is not optimized for
NUMA, please take note of the soft-switch setting for QlikView versions prior to 11.2 SR2 or disable NUMA in
the BIOS if applicable.
========================================================================
Servers running QIX engine benefit from the following settings on average:
Setting/Configuration
|
Value
|
Hyper-threading
|
Enabled 4 socket /Disabled 2 socket
Note: For 4-socket solutions, having hyper-threading enabled is beneficial on average. There are, however, cases when disabling it leads to improved performance.
|
Power Management (Power profile)
|
Max performance (BIOS and Windows setting)
|
Node Interleaving
|
Enabled (meaning that NUMA is disabled)
Note: Disabling NUMA has no significant impact on the performance as the product adapts its behavior if NUMA is enabled.
|
Intel Turbo Boost
|
Enabled
|
Memory configuration
|
Configured for best performance
Note: The DIMM slots for every CPU should be populated in accordance to the hardware manufacturer’s specification for best performance.
|
Hardware pre-fetch
|
Enabled
|
=======================================================================
Test done by users:-
Scheduled 40 concurrent QVW reloads in the QDS (the QVW's generated data, wrote QVDs, read QVDs, and then logged stats).
The test hardware was a HP DL580 G7 with 4 X Intel Xeon Processor E7-4870 (4 CPU X 10 cores) and 256GB RAM. By disabling hyperthreading, the average document refresh time went from 02:53 to 01:50.
=============================================================
Conclusions:-
-->Preferably we need to have utmost 2 sockets of CPU cores at the Max for QLIK.
-->Disabling NUMA is Advised if performance is not good.
-->If you don't have option to disable then do soft switch enable.
( if in case NUMA cannot be disabled, "EnableNumaRoundRobin=0" has to be written in "setting.ini" under "QlikViewServer" folder.
EnableNumaRoundRobin=0 is defaulted and means disabled functionality.
Friday, 21 September 2018
Assigned Named CALs not loading on License Page
QlikSense
Assigned Named CALs not loading on License Page
Error when clicking on the "Add User" icon:
Not found: EntLicenses.Properties.CalInfo.AssignedList.AddAssignedUsers
Cause
This is caused by a garbled Machine ID in BorrowCALData.PGO.In order to see it, follow Article #2773 Reading PGO contents and CAL assignements
Resolution
Follow these steps: Stop all QlikView services;Rename BorrowCALData.PGO found in the configured root directory and default ProgramData QlikViewServer folder: c:\ProgramData\Qliktech\QlikViewServer
Default root: c:\ProgramData\Qliktech\Documents
Start all QlikView Services.
Monday, 17 September 2018
Inspecting Qlik Sense websocket communication
QlikSense
Inspecting QlikSense websocket communication
Inspecting Qlik Sense websocket communication is useful for a variety of reasons. Let’s see how to inspect websocket traffic, and then what to look for when it comes to websocket traffic from the Qlik Sense Engine.
HOW TO INSPECT WEBSOCKET TRAFFIC
Before you get started checking out websocket traffic from Qlik Sense, you must know how to use browser dev tools to inspect websocket traffic. Open a tab in Chrome and open the dev tools for that tab, then navigate to a Qlik Sense app or mashup. Now in dev tools, go to the network tab, and filter for WS. You should see the websocket listed, select it. Now notice the tabs for headers, frames, cookies, and timing. You can inspect request and response headers in the headers tab, see cookies sent with the request in the cookies tab, and check out the load time in the timing tab. But the frames tab is where the action is. Click on that and you can see all of the messages sent and received over the websocket.

websocket.png
WHAT TO LOOK FOR WITH QLIK SENSE WEBSOCKET TRAFFIC
All the communication with the Qlik Sense engine happens over the websocket. You can see the messages for authenticating and connecting, opening a doc, creating and fetching objects, getting layouts, and more. You’ll want to match messages sent, which are highlighted in green, with its response message. Both will have the same id.
Here’s an incomplete list of good uses for checking out the websocket communication:
CHECKING THE STATUS OF THE CONNECTION
The first two frames should always be the responses for authentication and connection. In the authentication response, you can see the user id and directory, the logout uri, and whether authentication is required or not. In the connection response, you can see that the connection was successful and whether a new session was created, or a session was attached to an existing session. If the session was attached, that means its sharing the session with another existing session. This is what you would want to check if you were opening up two or more websocket connections to the same app and wanted to make sure the connections were going to share the same session. You can also see the messages sent and received when opening a doc, which can sometimes be useful debugging any issues.
DEBUGGING
This one’s kind of obvious but should be mentioned. Here’s an example. If you’re trying to embed objects and they’re not showing up on the page, you should inspect the websocket communication. You can check to make sure that a connection is made, the doc has been opened successfully, and the getObject message has been sent. Then you can check the response message to see if it tells you anything about your issue. If you try to get an object but have the wrong id, for instance, you’ll see that you don’t get an error for anything, but the response just doesn’t contain an object, which is a good indication that you just requested an object that doesn’t exist.
Change Root Directory in Sense Server
QlikSense
Change Root Directory in Sense Server
• Create a new folder for share on the intended destination
• Share this path
• Right Click > Properties
• Share > Share
• Add in the service account to have Read/Write permissions
• Copy the Network path to a text editor for reference later
• Stop all Qlik Sense services except for the Qlik Sense Repository Database / PostgreSQL on all nodes
• Move the Apps, ArchivedLogs, CustomData, and StaticContent folders from the previous share location to the new share
• Open the QlikSenseUtil.exe file (default location C:\Program Files\Qlik\Sense\Repository\Util\QlikSenseUtil\QlikSenseUtil.exe)
• If you've customized the installation path for Qlik Sense then it will be located at Drive:\Path\Where\Installed\Repository\Util\QlikSenseUtil\QlikSenseUtil.exe with adjustments to the bolded section to point to where Qlik Sense has been installed
• In QlikSenseUtil
• Click on the Connect to database button to connect to the underlying Repository Database
• Host Name: Enter the hostname of the Repository database
• Most situations would use localhost here if run from the Central Node
• Database user: qliksenserepository
• Unless you've configured the site to run using a different account. This is extremely rare
• Password: password for the qliksenserepository user
• Next click on the Service Cluster section and click OK to retrieve the current share path values
• Replace the existing values with the new share path
• Ensure that there are no double slashes in the paths (e.g. \\QlikSense\\Apps) as this is not a logical Windows path
Example before values:

Example after values:

• Click on Clear to clear the values and then OK to retrieve the values which exist in the underlying database to ensure that the previously entered values were saved in an expected manner
• It is ideal here to copy one of the paths and ensure that they work as expected in Windows
• Start all previously stopped Qlik Sense Services
Migrating Qlik Sense from One Server to Another
QlikSense
Migrating Qlik Sense from One Server to Another
On original server
• In QMC, go to Certificates section and export new certificates using the FQDN of the new server.• Be sure to include the Private key
• We need the certificates to be in the Windows format
• Record the UNC root path specified in the Service Cluster section in the QMC
• Stop all services except for the Qlik Sense Repository Database
• Create a new folder for the backup, e.g. C:\backup
• Open MMC and Export the Trusted Root Certificate used by Qlik Sense from the Local Computer / Computer Account snap-in. And place it into the backup folder
• Be sure to include the Private key
• Take a backup of the database (relevant help link)
• Sample command:
"C:\Program Files\Qlik\Sense\Repository\PostgreSQL\9.6\bin\pg_dump.exe" -h localhost -p 4432 -U postgres -b -F t -f "c:\backup\QSR_backup.tar" QSR
• Copy all subfolders in the UNC root specified in the Service Cluster Section in the QMC to the backup folder
• Copy the Server certificate from the Exported Certificates folder to the backup folder (default: C:\ProgramData\Qlik\Sense\Repository\Exported Certificates)
• Optional:
• Zip the Backup folder for ease of transfer
New Server
• Install Qlik Sense of the same version• During the installation process uncheck the check box to start services after installation. We will want to do extra configuration before Qlik Sense initializes
• Transfer the backup from the old server to local disk on the new server
• While the installer is working:
• Import the Trusted Root and Server certificate into the Local Computer / Computer Account snap-in section in their appropriate areas:
• Server > Personal
• Trusted Root > Trusted Root Certification Authorities
• Ensure that you mark the certificates as exportable
• Once the installation has finished, start the Qlik Sense Repository Database
• Restore the backed up copy of the database
• Sample command: "C:\Program Files\Qlik\Sense\Repository\PostgreSQL\9.6\bin\pg_restore.exe" -h localhost -p 4432 -U postgres -d QSR "c:\backup\QSR_backup.tar"
• If using a different share path for the Qlik Sense content
• Copy all subfolders from the UNC root specified in the Service Cluster Section in the QMC on the old server into a newly configured UNC path for the new server
• Open QlikSenseUtil
• Default path C:\Program Files\Qlik\Sense\Repository\Util\QlikSenseUtil\QlikSenseUtil.exe
• Click Connect to database
• Enter superuser credentials
• Click OK
• Go to the Service cluster section
• Click OK to get the current values
• Make the appropriate edits
• Click Save
• To validate that the changes have been recorded:
• Click Clear
• Click OK
• To launch Qlik Sense with the new hostname:
• Open cmd.exe with administrative rights
• Change the directory to the Repository install path
• Default path C:\"Program Files"\Qlik\Sense\Repository
• Execute the following command: Repository.exe -standalone -restorehostname
• Allow the Repository.exe to run for a while
• Key log elements in C:\ProgramData\Qlik\Sense\Log\Repository\Trace\ > System_Repository
• Since no other services are running, a successful result from this restore command is the Repository to fully initialize but be unable to connect to the other services
• End the Repository.exe process in Task Manager
• Start all Qlik Sense services
Access the QMC and/or Hub to confirm that all previous working functionality is present
Subscribe to:
Posts (Atom)